Development Tools Setup

All these packages can be install using the SDK Manager. Another vital tool for the Android development is the AVD (Android Virtual Device), which is an emulator that allows you to model an actual device by defining the hardware and software options to be emulated by the Emulator.
Google now provided all these development tools as a single pre-packaged bundle. The ADT Bundle provides everything you needed to start developing applications, including suitable version of the Eclipse IDE with built-in ADT for faster and easy installation. You can download here from android developer website.
After you downloaded the ADT Bundle, unzip the contents(the Eclipse, SDK and the ADT Manager) in a specific directory.Open the Eclipse from the folder or make a shortcut of the Eclipse launcher icon to your desktop for easy access.

Installing Specific Version(s) of Android SDK
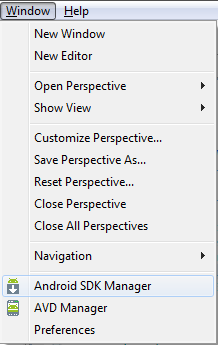
To install a version(s) of Android SDK package go to the Eclipse window menu, then choose Android SDK manager, which opens the SDK Manager window that would allow us to install a particular version of the SDK.
Select the version(s) of SDK you want to install (including the Google API), you can support as many devices as possible. There is also an Android SDK Tools as well as Extras package. Extras contained useful bundles such as Support Library, APK expansion library, Google Cloud Messaging, AdMob Ads SDK... etc. You can select the any package you like for integration to your apps components.

If you want to install all the selected packages click the Accept All radio button and install them.

Creating and running Android Virtual Devices
Click on the Eclipse menu window and go to Android Virtual Device Manager. Click the new button to create a device. Give your AVD a unique name, select the version of Android device you want to run and click Ok. There is also a defined configurations for various Android devices, all you need to do is to click on the Device Definition tab, select the kind of device you want to test against and the rests are done for you!

The new Android Development Tools comes with right configurations of different types of Android devices, ranging from the device's resolution, memory and VM heap sizes. You also need to allocate SD card storage size for the device. To make your AVD even faster during start up, check the snapshot from the Emulator options.

Finally select the AVD you configured and click start. The AVD usually takes a minutes to boot. When you are done with the AVD, its advisable not close it in order to save time of running it again, unless if you no longer have more tests to do.

Blogwalking
ReplyDeleteProject Manager